First Scan with OXO
OXO’s open-source platform goal is to make running and building powerful vulnerability scanners simple and scalable.
Installation
To install OXO, the only requirement is to have Docker installed and the Python package manager (pip).
If you are missing either of those requirements, you can follow the docker instructions and pip instructions.
OXO is shipped as a python package, to install it, simply run:
pip install -U ostorlab
-U is to force upgrading to the latest version. OXO is under active development and new versions are shipped on almost a daily basis.
Autocompletion
To enable command autocompletion, add the following lines depending on your shell of choice.
eval "$(_OSTORLAB_COMPLETE=bash_source ostorlab)"
Concepts
Before running your first scan, let’s first go over some basic concepts. Ostorlab scanner relies on agents to perform the actual scanning.
An agent can be a popular open-source tool, like nmap or sqlmap that performs actual vulnerability detection. An agent can also be an intermediary tool that extracts, processes or feeds information helpful for the detection of vulnerabilities.
For instance a crawler listing pages in a web application, a file parser extracting metadata, a port scanner identifying open ports, or a subdomain enumeration listing new subdomains. All of these are examples of agents.
The agents collaborate by exchanging messages. Each agent specifies the type of messages they care about and the type of message they share. For instance, a port scanner needs IP addresses and generates port and service fingerprint lists, a crawler needs a URL and generates a set of URLs and intercepted requests and responses, and a file metadata extractor needs a file and generates metadata and file fingerprints.
The interest in a specific type of message is done using what is called a selector. An in-selector is the message the agent is expecting, and an out-selector is one the agent is generating.
We will dig much deeper into the selectors and some of their special properties later on, but for now these concepts are sufficient to run our first scan.
Scan Run
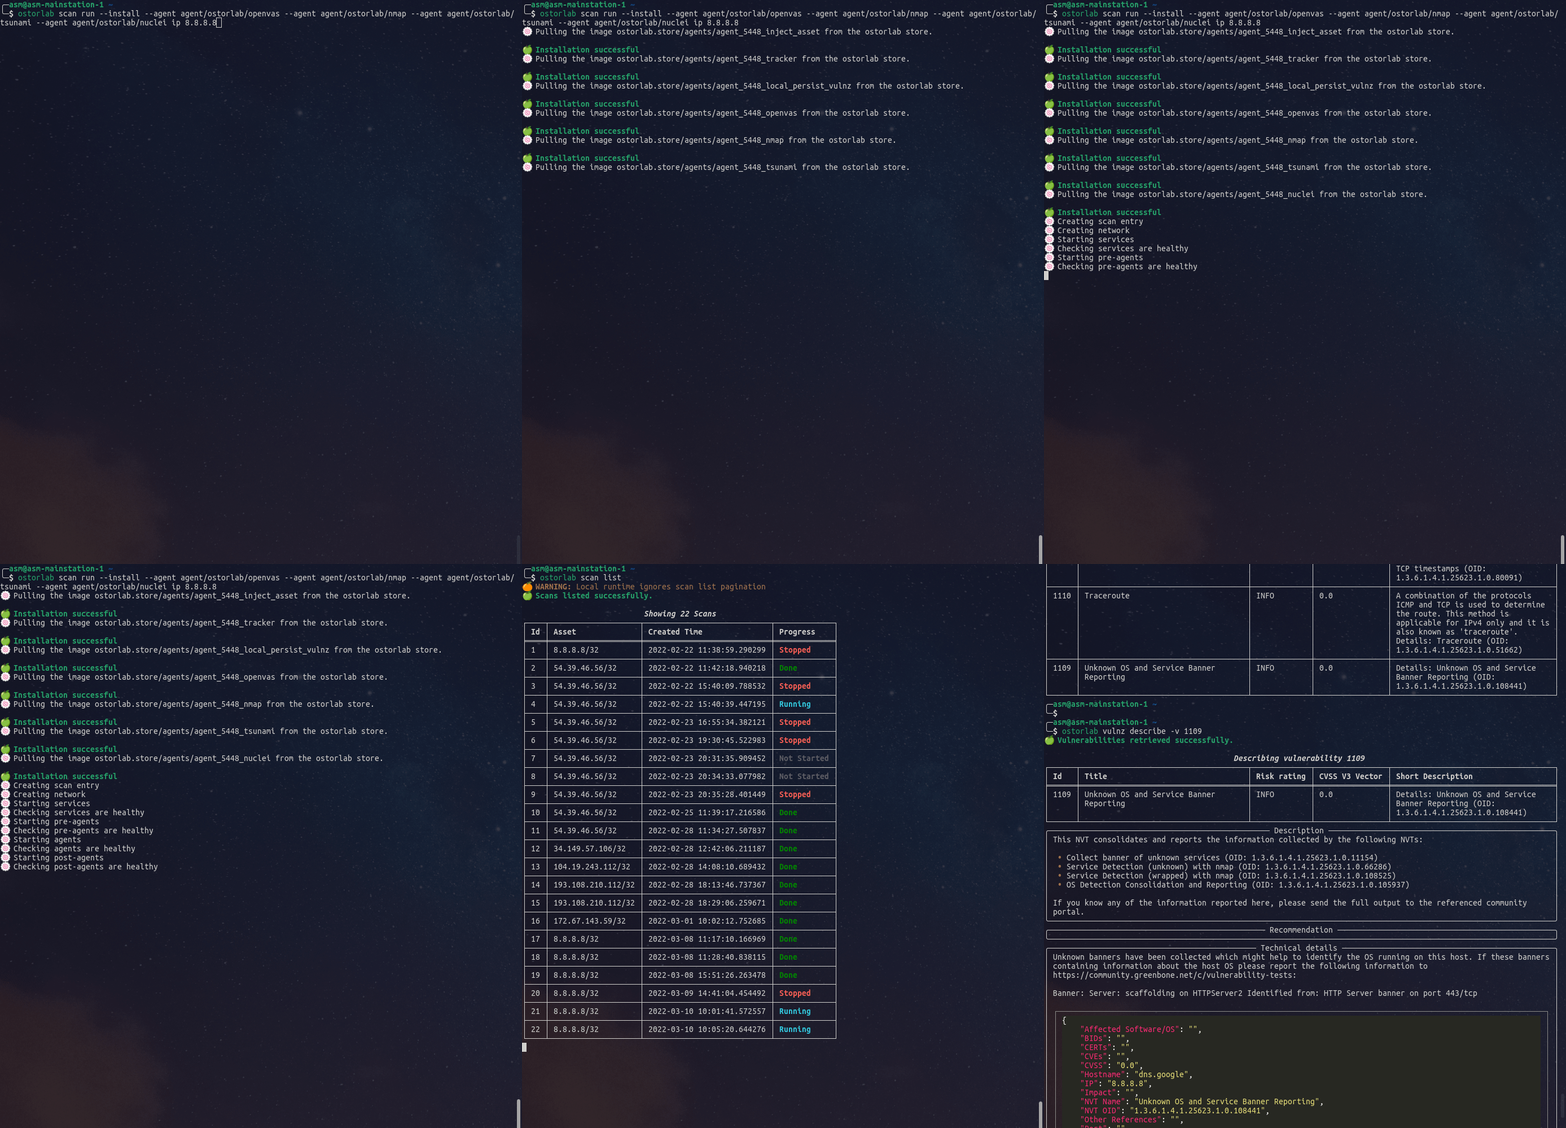
To perform for instance a scan that targets an IP address 8.8.8.8 with the open-source tools Nmap, OpenVAS, Tsunami and Nuclei, we will use the following command:
oxo scan run --install --agent agent/ostorlab/nmap --agent agent/ostorlab/tsunami --agent agent/ostorlab/nuclei --agent agent/ostorlab/openvas ip 8.8.8.8

Let’s unpack this command:
scan run: This is self-explanatory and simply states that we would like to run a scan. Ostorlab ships several commands
all grouped by category. Categories include scan, vulnz, and agent to perform different operations that we will
cover later on.
--install: this flag instructs OXO to fetch the listed agents from the oxo store. An agent can also be run
locally without fetching from the store by using the agent build command. This flag also fetches a set of default
agents needed to perform the scan, like persisting the vulnerabilities locally.
--agent xxx: This flag sets the agent to run. In this example we are referencing the Nmap, OpenVAS, Tsunami and
Nuclei open source projects. The name agent/ostorlab/ostorlab refers to the provider of the agent.
The OXO store is publicly and freely available and others can publish their own agents. To learn more about that, check out the write your first agent tutorial (link here).
ip 8.8.8.8 specifies the asset type and target asset details. OXO is made to support all types of assets. To list
them use the command oxo scan run –help. More are added regularly with supporting scanning agents.
The scan run command will exit once the scan setup has completed, but the scan will keep running. Behind the scenes, OXO supports the multiple scanning runtime, and the default one is local that uses docker.
Scan Progress
To see the scan in action, you can list the created services and even log them:
docker service ls
docker service logs -f <container_name>
OXO also supports following the scan and streaming its logs. By default, the logs of all the agents are streamed to the console, but you can also follow a specific agent or a set of agents using the --follow flag.
For example, to track the logs of the Tsunami agent, you can use the following command:
oxo scan run --install --follow agent/ostorlab/tsunami --agent agent/ostorlab/nmap --agent agent/ostorlab/openvas --agent agent/ostorlab/tsunami --agent agent/ostorlab/nuclei ip 8.8.8.8
If you prefer not to stream the logs, you can use the --no-follow flag:
oxo scan run --install --no-follow --agent agent/ostorlab/nmap --agent agent/ostorlab/openvas --agent agent/ostorlab/tsunami --agent agent/ostorlab/nuclei ip 8.8.8.8
To see the scan progress, use the scan list command
oxo scan list

Access Vulnerabilities
Once a scan has completed, you should see a Done in the progress column. Please note that some of the provided tools take a lot of time to update its knowledge base and the scan might take up to an hour to complete.
Once the scan has completed, or even as the scan is running, you can list identified vulnerabilities using the command:
oxo vulnz list -s <scan-id>

To list the details of a vulnerability:
oxo vulnz describe -v <vuln-id>

Vulnerabilities description and details are stored in markdown and the CLI handles their rendering.
Next
Congratulations, you have successfully run your first scan.
For the next tutorial, we will go over how Ostorlab supports passing arguments to agents and configuration settings, like the agent replica count or memory limit using the agent group YAML file.